



Your motorcycle’s brakes are easy to ignore when everything feels normal. The lever pulls in, the pedal works, the bike slows down, and you move on with the ride. But brakes are one of the few systems where waiting for an obvious failure is the wrong maintenance strategy.
Good bike brake maintenance is about catching wear, contamination, leaks and changes in brake feel before they become serious problems. A basic inspection can often be done at home, while jobs such as hydraulic bleeding, component replacement and repairs should be handled according to the motorcycle manufacturer’s procedures or by a qualified technician.
The Motorcycle Safety Foundation’s pre-ride inspection checklist recommends checking brake function and inspecting pads and discs, while also checking hydraulic brake fluid levels and looking for leaks.
Why Bike Brake Maintenance Matters
Motorcycle brakes work under demanding conditions. Every time you slow down, kinetic energy is converted into heat through friction, and repeated braking can put considerable thermal and mechanical stress on pads, discs, calipers and the hydraulic system.
That makes bike brake maintenance more than a cleanliness exercise. A brake pad that is nearing its wear limit, a disc showing abnormal damage or a brake-fluid leak can directly affect stopping performance.
The good news is that many warning signs appear before a braking system becomes completely unusable. Changes in lever feel, unusual noises, visible pad wear, fluid loss or vibration can all be reasons to investigate.
The important rule is simple: if braking performance feels different from normal, don’t treat it as something that will automatically fix itself.
Read More: Bike Tyre Maintenance
How Motorcycle Brakes Work
Most modern motorcycles use hydraulic disc brakes, although drum brakes are still found on some motorcycles and scooters. In a disc-brake system, squeezing the brake lever or pressing the rear pedal creates hydraulic pressure that moves pistons in the caliper and pushes the brake pads against the disc.
The resulting friction slows the wheel. The system has to manage both the mechanical force generated by the rider and the heat produced when the motorcycle slows down.
Brake fluid is therefore a critical part of the hydraulic system. It transfers pressure from the master cylinder to the caliper, which is why the condition and level of the fluid matter.
Honda’s motorcycle documentation, for example, instructs owners to inspect brake-fluid levels and says that a low level or excessive lever/pedal free play can require inspection for pad wear or a possible leak.
1. Start With a Basic Brake Function Check
Before looking for individual components, start with how the brakes actually feel.
With the motorcycle stationary in a safe location, apply the front brake and then the rear brake separately. Each brake should provide a firm, predictable response appropriate to the motorcycle.
The Motorcycle Safety Foundation recommends checking whether each brake can independently prevent the motorcycle from rolling during its pre-ride inspection.
Don’t worry about judging the exact stopping force while the motorcycle is stationary. What you’re looking for is something obviously abnormal: a lever that feels unusually soft, excessive movement, a pedal that feels strange, fluid appearing around a component, or a brake that doesn’t seem to respond normally.
If something feels significantly different from your usual baseline, the next step should be inspection rather than riding normally and hoping it improves.
2. Inspect the Front Brake Pads
The front brake generally deserves particular attention because it contributes substantially to stopping the motorcycle.
Look through the caliper opening and identify the friction material on the brake pads. You want to see sufficient material remaining between the backing plate and the disc.
Don’t confuse the metal backing plate with the friction material. As the pad wears, the friction material becomes progressively thinner, and the motorcycle manufacturer’s specified minimum thickness should determine when replacement is required.
The exact inspection method varies between motorcycle designs, so the owner’s manual is the correct reference for your particular model.
A useful habit is to check the pads periodically rather than waiting for an unusual noise. The Motorcycle Safety Foundation specifically includes brake-pad condition in its pre-ride inspection guidance.
3. Check the Rear Brake Pads Too
Rear brakes are sometimes overlooked because riders naturally pay more attention to the front brake lever.
That is a mistake.
The rear brake is still an important part of the motorcycle’s braking system and should be inspected for pad wear just like the front. Some motorcycles may also experience different wear rates between front and rear pads depending on the bike, rider and riding conditions.
Look at the available friction material and check for anything obviously abnormal, such as uneven wear or damage. If you cannot see the pads clearly, don’t dismantle the brake assembly simply to inspect them unless you know the manufacturer’s procedure.
A professional inspection is preferable when visibility is poor or the brake assembly requires disassembly.
4. Inspect the Brake Discs
Brake discs should have a reasonably consistent working surface.
Look for deep grooves, cracks, unusual scoring, blue or discoloured areas, heavy corrosion or obvious physical damage. Surface appearance alone does not always tell you whether a disc is within its service limits, so measurements and manufacturer specifications matter when wear is suspected.
The Motorcycle Safety Foundation includes disc condition in its brake inspection checklist.
A disc that looks slightly dull after the motorcycle has been parked for some time is not automatically a problem. Light surface corrosion can occur, particularly after exposure to moisture. What matters is whether the disc develops abnormal damage, persistent roughness, excessive corrosion or other symptoms while riding.
Never assume that a visibly damaged disc is safe simply because the motorcycle still stops.
5. Look for Brake Fluid Leaks
Hydraulic brake systems should not be losing fluid during normal operation.
Inspect around the master-cylinder reservoir, brake lines, connections and calipers for signs of wetness or leakage. Also look around the area where the brake components connect to the wheel.
The Motorcycle Safety Foundation specifically includes hydraulic brake components, hoses, master cylinders and calipers in its inspection for leaks and damage.
A falling fluid level deserves attention as well. Honda owner manuals note that a low brake-fluid level can be associated with pad wear, while a low level with pads that are not worn can indicate a possible leak requiring inspection.
This is not an area where topping up the reservoir and ignoring the reason for the low level is good bike brake maintenance.
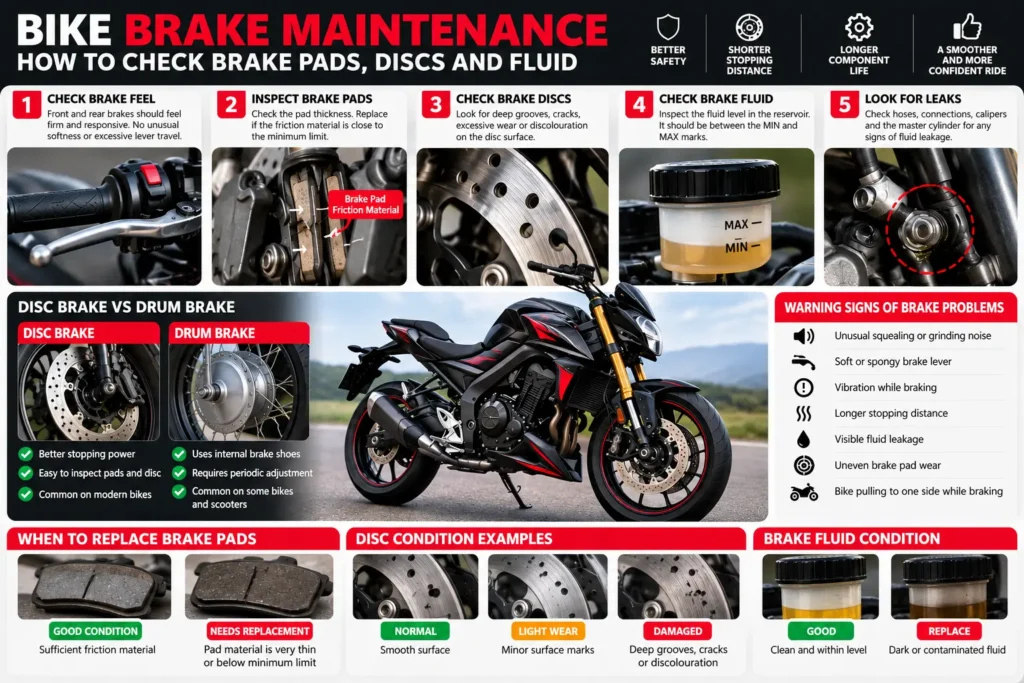
6. Check the Brake Fluid Level
Most motorcycles with hydraulic disc brakes have a brake-fluid reservoir with level markings.
The motorcycle should be positioned as specified by the manufacturer when checking the reservoir. Honda manuals, for example, specify keeping the motorcycle upright and the reservoir appropriately positioned so the level can be checked against the markings.
The fluid should normally sit within the manufacturer’s specified range. Don’t simply add fluid because the level is lower than it was months ago.
Brake-fluid level can change as brake pads wear, but a significant or unexpected reduction can also indicate a leak or another problem. The correct fluid specification must also come from the motorcycle manufacturer; different systems may require different fluid types.
7. Don’t Treat Brake Fluid Like Engine Oil
Brake fluid has a completely different job from engine oil, and it should be handled accordingly.
It can absorb moisture over time, and contamination can affect hydraulic performance. Honda documentation, for example, recommends using fresh brake fluid from a sealed container because an opened container can absorb moisture from the air.
That is one reason bike brake maintenance should not involve casually opening a bottle of old fluid that has been sitting in the garage for months or years.
Don’t mix fluids simply because they look similar. Check the owner’s manual or service documentation for the exact specification required by your motorcycle.
8. Pay Attention to Brake Lever Feel
The brake lever is one of your best sources of information.
A healthy hydraulic brake system should have a predictable lever feel. If the lever suddenly feels softer than normal, travels farther before braking begins or feels inconsistent, something deserves investigation.
Possible causes can include worn pads, air in the hydraulic system, fluid problems or other mechanical issues. You should not attempt to diagnose the exact cause solely from lever feel.
Honda’s documentation specifically links excessive brake lever or pedal free play with the need to inspect the braking system.
A change in feel is therefore a warning, not something to adapt to by simply squeezing the lever harder.
9. Watch for Brake Pad Wear Symptoms
Sometimes the first indication of brake-pad wear isn’t visible inspection but a change in behaviour.
Possible warning signs include unusual squealing or grinding, reduced braking response, changes in lever feel, vibration or a sensation that the motorcycle isn’t slowing as it normally does.
Not every brake noise means the pads are worn out. Dust, moisture, pad material and operating conditions can influence brake noise, so the sound should be considered alongside the physical condition of the system.
Grinding noises, however, should never be casually ignored. If the friction material is severely worn, continuing to ride can allow the backing material to damage the disc.
10. Don’t Ignore Brake Vibration
A vibration while braking can have several possible causes.
It may be related to disc condition, pad condition, wheel-related issues or other components, and identifying the exact cause requires proper inspection.
Pay attention to when the vibration occurs. Does it happen only under heavier braking? Is it felt through the lever? Does the motorcycle pull to one side? Does the sensation appear consistently at particular speeds?
These details can help a technician diagnose the problem more efficiently.
If braking vibration is new or becoming worse, bike brake maintenance should move from a routine inspection to a proper diagnostic check.
Disc Brakes vs Drum Brakes
Not every two-wheeler uses the same braking hardware.
Disc brakes use a rotor and caliper assembly, making the pads relatively accessible for inspection. Drum brakes use internal brake shoes inside a drum, so the inspection and servicing procedure is different.
This distinction matters because advice designed for a disc brake should not automatically be applied to a drum brake.
For a drum-brake motorcycle or scooter, follow the manufacturer’s inspection and adjustment procedure. If the brake requires opening the drum assembly or adjusting internal components and you’re not familiar with the process, professional servicing is the safer option.
How Often Should You Check Motorcycle Brakes?
There isn’t one universal interval that works for every motorcycle.
A commuter covering a relatively small distance in normal conditions will experience different brake wear from a rider who spends most of the year in heavy traffic, rides in mountainous terrain or frequently carries a passenger.
Manufacturer maintenance schedules should therefore be your primary reference. Honda notes that its maintenance intervals are based on average riding conditions and that some items may require more frequent attention under unusually wet or dusty conditions or demanding use.
A good practical approach is to combine scheduled servicing with a quick visual and functional inspection before longer rides.
Indian Riding Conditions Can Increase Brake Stress
Motorcycles in India often spend significant time in stop-start traffic.
Repeated acceleration followed by braking generates more heat than steady-speed cruising, while dust, rain, mud and road contamination can add another layer of stress.
Riders who regularly travel through congested urban areas should therefore pay attention to brake feel and component condition rather than relying only on the odometer.
Wet conditions also deserve extra attention. Water and contamination can temporarily change braking behaviour, while prolonged exposure to moisture can contribute to corrosion on exposed metal surfaces.
This doesn’t mean every motorcycle needs unusually frequent servicing. It means your actual riding environment should be considered when following the manufacturer’s maintenance recommendations.
Can You Do Bike Brake Maintenance Yourself?
Some basic checks are suitable for many owners.
Visual inspection of brake pads and discs, checking fluid levels, looking for leaks and paying attention to changes in brake feel can all form part of routine owner checks. The Motorcycle Safety Foundation’s T-CLOCS checklist is designed around exactly this kind of pre-ride inspection.
More involved work is different.
Replacing pads, servicing calipers, bleeding hydraulic systems, replacing brake lines or working on ABS-related components requires the correct tools, procedures and technical knowledge. Brakes are safety-critical, so improvising because a repair looks simple can have serious consequences.
When in doubt, use the manufacturer’s service information or have the motorcycle inspected by a qualified technician.
Read More: Kia Carens Clavis EV Review
Common Bike Brake Maintenance Mistakes
Ignoring Thin Brake Pads
Waiting until braking performance becomes obviously poor is a bad strategy. Pads should be inspected before they reach or pass the manufacturer’s minimum specification.
Topping Up Low Brake Fluid Without Finding the Cause
A low level can have an explanation, but it can also indicate pad wear or a leak. Adding fluid without investigating the cause can hide an underlying problem.
Using the Wrong Brake Fluid
Brake-fluid specifications are not interchangeable simply because the fluids look similar. Always follow the manufacturer’s specified type.
Ignoring Brake Noise
Not every squeak means failure, but persistent or severe noise deserves inspection, particularly when accompanied by changes in braking performance.
Washing Contaminated Components Carelessly
Oil, grease and other contaminants should never be allowed onto braking friction surfaces. If a disc or pad has become contaminated, the correct remedy depends on the component and manufacturer’s guidance.
Assuming Front and Rear Brakes Wear Identically
They don’t necessarily wear at the same rate. Both systems need individual inspection.
When Should You Stop Riding?
Some brake problems should be treated as a do not ride until inspected situation.
Examples include a significant brake-fluid leak, a brake lever that suddenly becomes extremely soft, severe loss of braking performance, visibly damaged brake components, severe grinding, or a brake that fails to operate correctly.
Don’t gamble with a safety-critical system because the motorcycle can still technically move.
If you’re unsure whether a braking problem is serious, arrange an inspection rather than testing the motorcycle on public roads to find out.
A Simple Motorcycle Brake Inspection Checklist
Before a long ride, you can use this basic checklist as a reminder:
- Check front brake operation.
- Check rear brake operation.
- Look at front and rear brake pads where visible.
- Inspect discs for obvious damage or abnormal wear.
- Check brake-fluid levels against the manufacturer’s markings.
- Look for hydraulic-fluid leaks.
- Check brake hoses and connections for visible damage.
- Pay attention to changes in lever or pedal feel.
- Listen for unusual or persistent brake noises.
- Check the braking system again after riding in particularly wet or dusty conditions.
This isn’t a substitute for the manufacturer’s maintenance schedule or a professional inspection, but it can help catch obvious problems before they become bigger ones.
Frequently Asked Questions
How do I know if my bike brake pads need replacing?
Check the remaining friction material against the minimum thickness or wear indicator specified by the motorcycle manufacturer. Uneven wear, unusual noises or reduced braking performance are additional reasons to have the brakes inspected.
How often should motorcycle brakes be serviced?
There is no single interval for every motorcycle. Follow the manufacturer’s maintenance schedule and inspect the brakes more frequently if you ride in heavy traffic, wet or dusty conditions, mountainous terrain or other demanding environments.
How do I check motorcycle brake fluid?
Keep the motorcycle positioned as specified in the owner’s manual and check the reservoir level against its upper and lower markings. If the level is below the specified range, investigate the reason rather than simply assuming more fluid is needed.
Can I change motorcycle brake pads myself?
Some experienced owners can replace brake pads using the correct procedure and tools, but brakes are safety-critical. If you are unfamiliar with the work or the motorcycle’s design, professional servicing is the safer choice.
What does a soft motorcycle brake lever mean?
A suddenly soft or unusually long lever can indicate a braking-system problem such as air, fluid issues, pad wear or another fault. It should be investigated rather than treated as normal.
Should I replace brake pads and discs together?
Not automatically. Pads and discs have different wear limits, so each component should be inspected against the motorcycle manufacturer’s specifications. A disc may remain serviceable when pads require replacement, while a damaged or excessively worn disc may require separate replacement.
Ride And Tech Verdict
Bike brake maintenance is one of those jobs where a few minutes of attention can be far more valuable than waiting for a problem to announce itself. Brake pads, discs, fluid, hoses and controls all play different roles, and a change in any of them can affect how confidently a motorcycle stops.
For most riders, the sensible approach is simple: inspect what you can see, understand how your motorcycle normally feels, follow the manufacturer’s service schedule and take any unusual braking behaviour seriously. Basic checks are useful, but they should never become an excuse to attempt repairs beyond your knowledge or the manufacturer’s recommended procedure.
The best maintenance habit is not knowing how to rebuild a caliper in your garage. It is knowing when something isn’t right before you need the brakes in an emergency.
Ride And Tech — Where Ride Meets Tech.
Drive Smarter. Ride Smarter.
Copyright (c) Ride And Tech. All rights reserved.

1 thought on “Bike Brake Maintenance: How to Check Brake Pads, Discs and Fluid”