



Your bike’s chain may look like a simple component, but it plays a critical role in transferring power from the engine to the rear wheel. A chain that is too loose, too tight, dry, dirty or poorly maintained can affect the way your bike feels to ride and may also accelerate wear on the chain and sprockets.
The good news is that taking care of your bike chain does not always require a visit to the service centre. With the right cleaning method, suitable lubricant and correct chain tension, most riders can handle basic chain care at home.
In this guide, we’ll explain bike chain maintenance step by step—from knowing when your chain needs cleaning and lubrication to checking its tension, spotting signs of excessive wear and understanding when the chain or sprockets may need replacement. Whether you are a daily commuter, weekend rider or new motorcycle owner, these simple practices can help keep your drivetrain working smoothly and safely.
Why Bike Chain Maintenance Is Important
The chain is one of the most hardworking parts of a motorcycle’s drivetrain. Every time you accelerate, engine power is transferred through the chain and sprockets to the rear wheel. Because of this constant load, the chain is exposed to friction, dust, water and road debris.
Regular bike chain maintenance helps reduce unnecessary friction and prevents premature wear of the chain and sprockets. A properly maintained chain can also deliver power more smoothly and reduce the chances of problems caused by excessive slack, insufficient lubrication or damaged links.
Ignoring chain care can gradually turn a small maintenance issue into an expensive repair. A neglected chain may become noisy, develop tight spots, stretch beyond its usable adjustment range or wear the sprockets unevenly. In severe cases, a damaged or improperly maintained chain can even come off the sprocket while riding.
For everyday riders, a few minutes of inspection and basic care at regular intervals can therefore go a long way toward keeping the motorcycle reliable and the drivetrain in good condition.
How Often Should You Clean and Lubricate a Bike Chain?
There is no single interval that works for every motorcycle. How often you need to clean and lubricate the chain depends on your riding conditions, the type of chain, weather and how much dust or water the bike encounters.
As a practical starting point, inspect the chain regularly and clean it when it becomes visibly dirty or contaminated. Riders who frequently travel through dusty roads, mud or rain may need to clean it more often than someone who mainly rides on clean city roads.
Lubrication should generally follow cleaning, particularly after the chain has been exposed to rain or water. However, applying more lubricant than necessary is not better. Excess lubricant can attract dust and dirt, creating an abrasive mixture around the chain and sprockets.
A simple maintenance routine
- Normal city riding: Inspect the chain regularly and clean and lubricate it as needed.
- Dusty or rough roads: Check it more frequently and clean off accumulated dirt before lubrication.
- After riding in heavy rain: Inspect, dry and lubricate the chain once the motorcycle is safely parked.
- After washing the bike: Make sure the chain is dry before applying a suitable lubricant.
- Before long rides: Check chain condition and tension as part of your pre-ride inspection.
Always follow the maintenance interval and chain specifications provided in your motorcycle’s owner’s manual. The manufacturer’s recommendation should take priority over any generic schedule because chain design, adjustment limits and lubrication requirements can vary between motorcycles.
What You Need for Bike Chain Maintenance
Before you start cleaning or lubricating your motorcycle chain, gather the basic tools and materials you need. Having everything ready makes the job easier and reduces the chance of using unsuitable products that could damage the chain or surrounding components.
Basic tools and supplies
- Chain cleaner: Use a motorcycle-specific chain cleaner or a product recommended for your chain type.
- Soft chain brush: A suitable brush helps remove dirt and old lubricant from the chain without unnecessarily damaging its surfaces.
- Motorcycle chain lubricant: Choose a lubricant designed for motorcycle drive chains and suitable for your riding conditions.
- Clean microfiber cloths: These can be used to wipe away loosened dirt, excess cleaner and old lubricant.
- Rear paddock stand or centre stand: This makes it easier to rotate the rear wheel while cleaning and inspecting the chain, if your motorcycle safely supports its use.
- Gloves: They help keep your hands protected from grease, dirt and cleaning chemicals.
- Owner’s manual: Keep it nearby for the manufacturer’s recommended chain slack, inspection points and maintenance procedure.
Avoid using unsuitable products
Not every household cleaner or lubricant is appropriate for a motorcycle chain. Some products can affect rubber sealing rings on modern sealed chains, while excessive use of unsuitable solvents may remove lubrication from areas that need to remain protected.
Before using any cleaning product, check its label and make sure it is compatible with your motorcycle’s chain. If the manufacturer specifies a particular type of cleaner or lubricant, follow that recommendation.
Once you have the right supplies, you can begin your bike chain maintenance routine.
How to Clean a Bike Chain Step by Step
A dirty chain can accumulate dust, mud, old lubricant and road grime, increasing friction and accelerating wear. Cleaning it properly before applying fresh lubricant helps the new lubricant work more effectively and makes it easier to inspect the chain for damage.
Follow these steps for a safe and effective cleaning process.
1. Park the bike safely
Place the motorcycle on a stable, level surface and switch off the engine. If your bike has a centre stand, use it according to the manufacturer’s instructions. A suitable paddock stand can also make the rear wheel easier to rotate during cleaning.
Never attempt to clean a moving chain with the engine running or while the motorcycle is in gear.
2. Allow the chain to cool
If you have just finished riding, give the motorcycle enough time to cool before beginning maintenance. Working around a hot chain, exhaust or other components can increase the risk of burns.
3. Remove loose dirt
Use a soft brush or cloth to remove loose dust, mud and debris from the visible parts of the chain. Rotate the rear wheel slowly by hand if the motorcycle is safely supported and you can do so without placing your fingers near pinch points.
4. Apply a suitable chain cleaner
Spray or apply a motorcycle-compatible chain cleaner according to the product instructions. Work gradually around the entire chain rather than flooding the surrounding wheel, brake components or tyres with cleaner.
Give the cleaner enough time to loosen accumulated grime, but do not allow the product to dry on the chain unless its instructions specifically allow it.
5. Brush the chain gently
Use a suitable chain brush to work the cleaner into the dirty areas. Pay attention to the outer plates, inner areas and spaces around the rollers while avoiding unnecessarily aggressive scrubbing.
For sealed chains, such as O-ring, X-ring or similar designs, use a cleaner that is specifically stated to be compatible with the chain.
6. Wipe away the dirt
Use a clean cloth to remove loosened dirt and excess cleaning solution. Continue until the chain is visibly clean enough to inspect properly.
This is also a good opportunity to look for damaged links, corrosion, abnormal wear or sections of the chain that do not move freely.
7. Let the chain dry
Allow the chain to dry completely before applying lubricant. If the cleaner’s instructions specify a particular drying method or waiting time, follow those instructions.
Once the chain is clean and dry, it is ready for the next step: proper lubrication.
Read More: 5 Common Bike Problems Every Rider Should Know
How to Lubricate a Bike Chain Correctly
Once the chain has been cleaned and completely dried, applying the right lubricant helps reduce friction and protects the chain from moisture and corrosion. However, using too much lubricant can be counterproductive because excess product can attract dust and road grime.
Follow these steps for better results.
1. Choose the right chain lubricant
Use a lubricant specifically designed for motorcycle chains and compatible with your chain type. Different products are designed for different riding conditions, such as regular road use, wet weather or dusty environments.
If your motorcycle manufacturer specifies a particular type of lubricant, follow the recommendation in the owner’s manual.
2. Apply lubricant to the correct area
Rotate the rear wheel slowly by hand and apply a thin, even layer to the chain. Focus on the areas where the chain rollers and links require lubrication rather than simply coating the entire chain with a heavy layer.
Take care to keep lubricant away from the rear brake disc, brake pads, tyres and other components where contamination could affect braking or grip.
3. Let the lubricant settle
After application, allow the lubricant to settle for the period recommended by the product manufacturer. This is particularly important with spray-type lubricants, which may need some time to adhere properly to the chain.
Avoid immediately riding at high speed after applying a product unless its instructions specifically state that it can be used immediately.
4. Wipe off excess lubricant
After the recommended settling time, use a clean cloth to remove excessive lubricant from the outer surfaces of the chain. The goal is not to leave the chain dripping with lubricant.
A thin, properly distributed layer is generally preferable to excessive application because too much lubricant can collect dust and create additional grime around the drivetrain.
How often should you lubricate a bike chain?
The correct interval depends on the motorcycle, chain type and riding environment. Check the chain regularly and lubricate it when it appears dry or after conditions such as rain or washing have removed or diluted the lubricant.
For the most accurate interval, follow the motorcycle manufacturer’s maintenance schedule rather than relying on a universal number of kilometres.
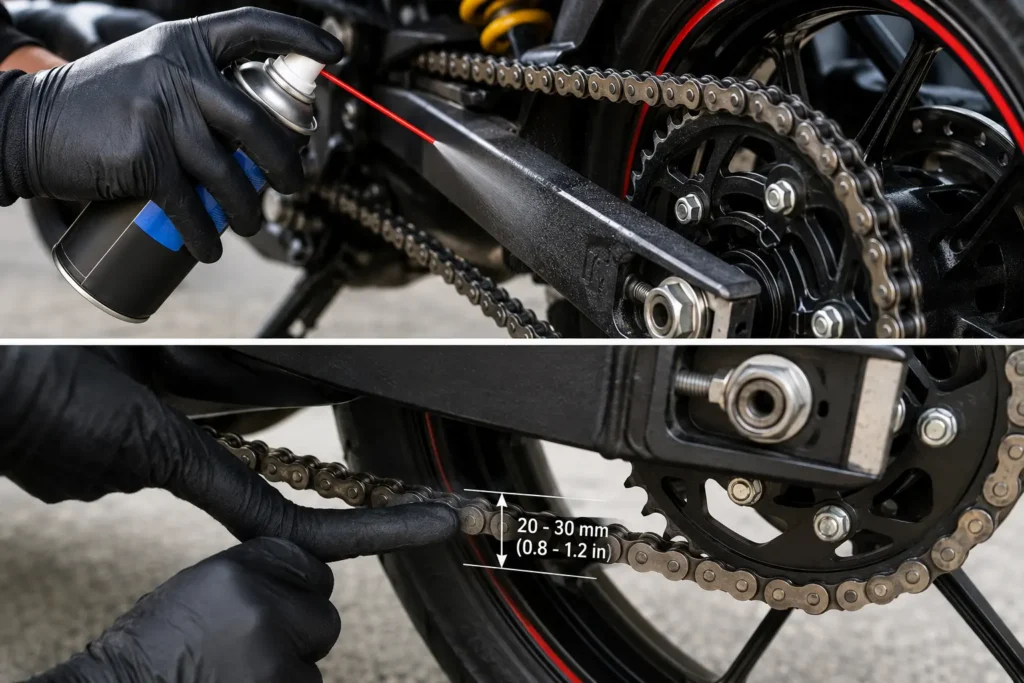
How to Check Bike Chain Tension
Correct chain tension is just as important as keeping the chain clean and lubricated. A chain that is excessively loose can slap against the swingarm or sprockets, while one that is too tight can place unnecessary load on the chain, bearings and other drivetrain components.
The correct amount of slack varies between motorcycles, so always check the owner’s manual for the specified measurement.
Step 1: Park the motorcycle correctly
Place the motorcycle on a stable, level surface and switch off the engine. Check the owner’s manual to determine whether chain slack should be measured with the motorcycle on its side stand, centre stand or another specified position.
Step 2: Find the correct measuring point
Manufacturers normally specify where the chain’s vertical movement should be measured. This is often around the midpoint of the lower chain run between the front and rear sprockets.
Do not assume that every motorcycle uses the same measuring point or measurement method.
Step 3: Measure the slack
Using a ruler or suitable chain-slack gauge, measure how far the chain can move vertically from its resting position. Compare the measurement with the specification provided by the motorcycle manufacturer.
Some chains can develop tighter and looser sections as they wear. Slowly rotating the rear wheel and checking different positions can help identify unusual variations in tension.
Step 4: Look for abnormal movement
While checking the tension, inspect the chain for:
- Excessive slack
- Very tight sections
- Rust or corrosion
- Damaged or stiff links
- Uneven wear
- Missing or damaged chain seals
- Unusual noise or movement
If the chain cannot be adjusted within the manufacturer’s specified range, it may be approaching the end of its service life or there may be another drivetrain issue that requires professional inspection.
Why correct chain tension matters
Maintaining the correct bike chain tension helps the chain engage properly with the sprockets and reduces unnecessary stress on the drivetrain. It also helps prevent excessive chain movement during acceleration, deceleration and suspension movement.
Because incorrect adjustment can cause serious mechanical problems, don’t guess the required slack. Use the motorcycle manufacturer’s specification for your particular model.
How to Adjust Bike Chain Tension
If the chain has more or less slack than the manufacturer specifies, it may need adjustment. Most motorcycles use rear-wheel adjusters that allow the wheel position to be moved slightly to achieve the specified chain slack.
However, the exact adjustment procedure differs between motorcycle models. Always follow the owner’s manual before loosening any axle or adjuster components.
Basic bike chain adjustment process
- Secure the motorcycle: Park it on a stable surface and support it according to the manufacturer’s instructions.
- Check the required slack: Confirm the correct chain-slack specification for your motorcycle.
- Loosen the rear axle as instructed: Do not remove the axle; loosen only the components specified in the service procedure.
- Adjust both sides evenly: Use the chain adjusters to move the rear wheel forward or backward. The adjustment marks or manufacturer’s measurement method should be used to keep the wheel properly aligned.
- Recheck the chain slack: Measure the chain again after making the adjustment.
- Check wheel alignment: Uneven adjustment can cause the rear wheel and chain to run out of alignment.
- Tighten everything to specification: The rear axle and related fasteners must be tightened to the torque specified by the manufacturer.
- Perform a final inspection: Rotate the rear wheel and recheck chain movement before riding.
Don’t adjust the chain by guesswork
A chain that looks slightly loose does not necessarily mean it needs adjustment. Likewise, tightening it as much as possible is not a solution. Over-tightening a motorcycle chain can be just as harmful as excessive slack.
If you notice a large difference in tension at different points of the chain, damaged links, worn sprocket teeth or an adjustment that is already near its limit, it is better to have the motorcycle inspected by a qualified technician rather than repeatedly tightening the chain.
After any adjustment, take a short, low-speed test ride in a safe area and listen for unusual noises or drivetrain behaviour. If anything feels abnormal, stop riding and have the motorcycle checked.
Signs Your Bike Chain Needs Maintenance
A motorcycle chain rarely goes from perfectly healthy to completely worn out without showing warning signs. Regular inspection can help you identify changes early and address them before they lead to more expensive drivetrain repairs.
Watch for these signs during routine checks:
1. The chain looks dry or rusty
A chain with little visible lubrication or signs of surface corrosion may need cleaning and lubrication. Rust should not simply be covered with fresh lubricant without first determining how severe the corrosion is.
2. Excessive chain slack
If the chain has more movement than the manufacturer’s specified range, it may require adjustment. Excessive slack can also indicate that the chain has stretched or worn significantly.
3. Tight spots in the chain
A healthy chain should not have dramatically different tension at different points. Rotate the rear wheel and check the chain at several positions. Noticeable tight and loose sections can indicate uneven wear.
4. Stiff or seized links
Individual links that do not articulate smoothly can prevent the chain from moving correctly around the sprockets. Cleaning may help with minor contamination, but severely stiff or seized links can indicate that the chain needs replacement.
5. Unusual noise from the drivetrain
Clicking, rattling, clunking or other unusual sounds from the chain and sprocket area should not be ignored. Noise can have several causes, including incorrect tension, poor lubrication, worn components or alignment issues.
6. Visible damage
Look closely for cracked, bent or damaged plates, missing seals, excessive corrosion or other physical damage. A visibly damaged chain should be inspected before the motorcycle is ridden again.
7. Frequent adjustment is required
If you repeatedly need bike chain adjustment even after setting the slack correctly, the chain may be approaching the end of its usable life. It can also be a sign that the chain and sprockets are wearing unevenly.
8. Sprocket teeth look worn
Chain condition should always be considered together with the sprockets. Hooked, pointed or noticeably uneven sprocket teeth can indicate drivetrain wear and may mean that simply replacing or adjusting the chain will not solve the problem.
If you notice several of these symptoms together, don’t rely on lubrication or adjustment alone. Have the complete chain-and-sprocket assembly inspected by a qualified technician.
When Should You Replace a Bike Chain and Sprockets?
Cleaning, lubrication and correct tension can extend the service life of a motorcycle chain, but they cannot reverse mechanical wear. Eventually, the chain or sprockets may need replacement.
There is no universal mileage at which every chain must be replaced. Service life depends on the motorcycle, chain quality, riding style, maintenance routine and conditions such as rain, dust, mud and heavy loads.
Common signs that replacement may be necessary
- The chain has reached its adjustment limit: If the required slack cannot be achieved using the manufacturer’s adjustment range, the chain may have stretched beyond its usable condition.
- Severely worn sprocket teeth: Hooked, pointed or badly uneven teeth can indicate significant sprocket wear.
- Stiff or seized links: Links that remain tight or do not move freely can affect smooth chain operation.
- Visible damage or corrosion: Cracked plates, damaged rollers, missing seals or severe rust are reasons to stop and have the chain inspected.
- Uneven chain wear: Large variations in tension as the rear wheel is rotated can indicate that the chain has worn unevenly.
- Persistent drivetrain noise: Unusual noise that remains after correct cleaning, lubrication and adjustment may indicate worn chain or sprocket components.
Should you replace only the chain?
In many cases, replacing only a severely worn chain while keeping heavily worn sprockets is not the best approach. The chain and sprockets work together, and worn sprocket teeth can accelerate wear on a new chain.
If one component is significantly worn, have the complete drive system inspected. Depending on its condition and the motorcycle manufacturer’s recommendations, replacing the chain and both sprockets as a set may provide more reliable results.
Don’t delay replacement
A worn chain is not simply a cosmetic maintenance issue. Continued riding with a severely damaged or incorrectly adjusted chain can increase the risk of drivetrain failure.
If you are unsure whether your chain is still safe to use, have it inspected by a qualified motorcycle technician before continuing to ride.
Common Bike Chain Maintenance Mistakes to Avoid
Even a rider who regularly cleans and lubricates the chain can unintentionally shorten its life by using the wrong products or maintenance methods. Avoiding these common mistakes can make routine chain care safer and more effective.
1. Applying lubricant over a dirty chain
Fresh lubricant does not remove the dirt already stuck to the chain. Applying more lubricant over heavy grime can create a sticky layer that attracts even more dust and road debris.
Clean the chain when necessary and allow it to dry before applying fresh lubricant.
2. Using too much lubricant
More lubricant does not necessarily mean better protection. Excess product can be thrown onto the rear wheel during riding or collect dirt around the drivetrain.
Apply a controlled, even layer and remove excess according to the lubricant manufacturer’s instructions.
3. Using unsuitable cleaning chemicals
Some strong solvents or household chemicals may not be appropriate for motorcycle chains, particularly sealed chains with O-rings or X-rings.
Always check that the cleaning product is compatible with your chain before using it.
4. Ignoring chain tension
Cleaning and lubrication cannot compensate for incorrect chain slack. A chain that is too tight or excessively loose can put unnecessary stress on the drivetrain.
Check the slack according to the motorcycle manufacturer’s specified procedure.
5. Adjusting only one side of the rear wheel
Uneven adjustment can affect rear-wheel alignment and cause abnormal chain and sprocket wear. Both sides should be adjusted according to the manufacturer’s procedure and alignment marks or measurements should be verified.
6. Forgetting the sprockets
The chain should not be inspected in isolation. Worn or damaged sprocket teeth can affect how the chain engages and may accelerate wear.
Include both front and rear sprockets during routine inspections.
7. Lubricating before a wet ride
Applying lubricant immediately before riding through heavy rain may not give the product enough time to settle. Follow the lubricant manufacturer’s recommended application and curing time.
8. Cleaning with the engine running
Never use the motorcycle’s engine to rotate the wheel while cleaning or lubricating the chain. Keeping the engine off and rotating the wheel manually, when the motorcycle is safely supported, greatly reduces the risk of serious hand or finger injuries.
9. Riding despite visible chain damage
Rust, damaged links, missing seals, severe tight spots or other obvious problems should not be ignored. If the chain appears damaged, have it inspected before riding.
Good chain care is not about doing more maintenance—it is about using the right products, correct technique and appropriate inspection intervals.
Can You Use WD-40 on a Bike Chain?
This is a common question among motorcycle owners, but the answer depends on which WD-40 product you mean and what you are trying to do.
Some WD-40 products can be useful for cleaning, loosening contaminants or displacing moisture, but a general-purpose water-displacing product should not automatically be treated as a replacement for dedicated motorcycle chain lubricant.
For routine chain care, use a lubricant specifically designed for motorcycle chains and follow the product manufacturer’s instructions. This is particularly important for modern sealed chains, where compatibility with the chain’s sealing components matters.
If you use a cleaning product before lubrication, make sure the chain is properly cleaned and dry before applying the appropriate chain lubricant. Avoid spraying any product onto the rear brake disc, brake pads or tyres.
In short: use a suitable motorcycle chain cleaner for cleaning and a dedicated motorcycle chain lubricant for lubrication unless your motorcycle or product manufacturer specifically recommends otherwise.
Bike Chain Maintenance Checklist
A simple inspection routine can help you catch chain problems before they become expensive repairs. Use this checklist as a quick reference during regular motorcycle maintenance.
Quick inspection checklist
- Check the chain for excessive dirt, mud or old lubricant.
- Look for rust, corrosion or damaged chain components.
- Check for stiff, seized or unusually tight links.
- Inspect the chain for excessive slack.
- Measure chain tension according to the motorcycle manufacturer’s specification.
- Clean the chain when it becomes heavily contaminated.
- Allow the chain to dry before applying lubricant.
- Apply a suitable motorcycle chain lubricant in a controlled amount.
- Wipe away excessive lubricant where appropriate.
- Inspect both front and rear sprockets for abnormal wear.
- Check for unusual drivetrain noise or vibration.
- Confirm that the rear wheel and chain remain correctly aligned after adjustment.
- Have the motorcycle inspected if the chain shows serious damage or cannot be adjusted within the specified range.
A simple rule to remember
Clean when dirty → lubricate when needed → check tension regularly → inspect the sprockets → replace worn components.
Following this routine can make chain maintenance easier while helping you identify problems before they affect your motorcycle’s drivetrain or riding safety.
Frequently Asked Questions About Bike Chain Maintenance
How often should I clean my bike chain?
There is no universal interval because riding conditions vary. Inspect the chain regularly and clean it whenever it becomes noticeably dirty or contaminated. Dusty roads, mud and frequent rain may require more frequent cleaning.
How often should I lubricate my bike chain?
Lubricate the chain according to the motorcycle and lubricant manufacturer’s recommendations. It should also be checked after riding in heavy rain or after washing the motorcycle, as water can remove or dilute the lubricant.
Can I clean my bike chain with water?
Water alone may not remove old lubricant and stubborn road grime effectively. If water is used during cleaning, make sure the chain is thoroughly dried afterward and then lubricated with a suitable motorcycle chain lubricant.
How do I know if my bike chain is too loose?
Measure the chain slack at the manufacturer’s specified location and compare it with the recommended range in your owner’s manual. Excessive movement, chain slap or repeated adjustment requirements can also indicate a problem.
How long does a motorcycle chain last?
There is no fixed lifespan for every motorcycle chain. Chain quality, riding style, maintenance, road conditions and drivetrain condition all affect service life. Regular inspection is more useful than relying on a fixed kilometre limit.
Should I replace the chain and sprockets together?
If the chain and sprockets show significant wear, replacing them as a set is often appropriate because the components work together. Have the complete drivetrain inspected before deciding what needs replacement.
Can poor chain maintenance affect bike performance?
Yes. Excessive dirt, incorrect tension, poor lubrication or worn components can increase friction and affect smooth power transmission. Proper maintenance helps the drivetrain operate more efficiently and reliably.
Conclusion
Your motorcycle chain needs regular attention because it plays a direct role in transferring engine power to the rear wheel. Keeping it clean, properly lubricated and correctly adjusted can help reduce unnecessary wear and keep the drivetrain operating smoothly.
The most important habits are simple: inspect the chain regularly, clean it when it becomes dirty, use a suitable lubricant, maintain the manufacturer’s specified tension and keep an eye on the sprockets and other drivetrain components. If you notice severe corrosion, damaged links, unusual wear or persistent drivetrain problems, get the motorcycle inspected by a qualified technician.
Good motorcycle maintenance is not about spending hours in the garage. A few minutes of proper care at the right intervals can help prevent avoidable repairs and keep your bike ready for the next ride.
Ride And Tech — Where Ride Meets Tech.
Drive Smarter. Ride Smarter.
Copyright (c) Ride And Tech. All rights reserved.

3 thoughts on “Bike Chain Maintenance: How to Clean, Lubricate and Adjust Your Bike Chain”