


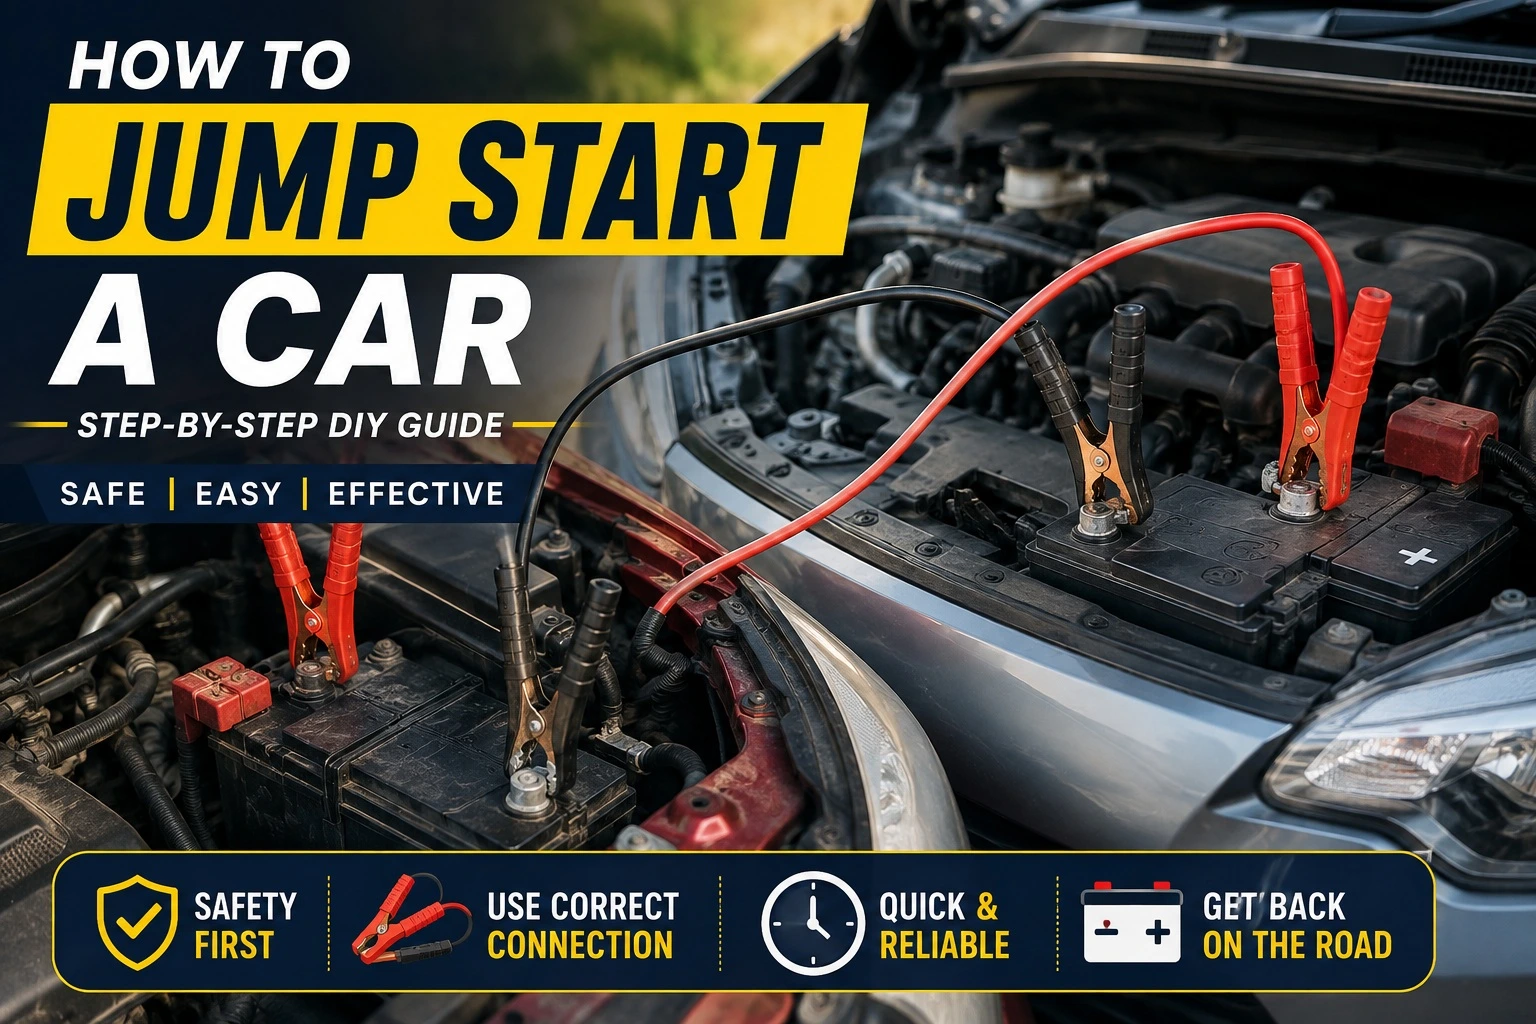
Need to jump start a car safely after a dead battery? You’re not alone. A dead car battery is one of the most common reasons a vehicle refuses to start, whether it’s because the headlights were left on, the car has been parked for several days, or the battery has reached the end of its lifespan.
Learning how to jump start a car is an essential DIY skill that every driver should know. A proper car jump start can get you back on the road within minutes while helping you avoid unnecessary towing charges or roadside assistance. However, connecting the jumper cables incorrectly can damage your vehicle’s electrical system or even cause injury.
In this Ride And Tech DIY Garage guide, you’ll learn how to jump start a car safely, the tools you’ll need, the correct order for connecting jumper cables, common mistakes to avoid, and what to do after successfully jump starting a car battery.
When Should You Jump Start a Car?
Before you jump start a car, it’s important to confirm that a dead car battery is actually the reason your vehicle won’t start. A car jump start is only effective when the battery has lost its charge but is otherwise in good condition. If the battery is damaged, leaking, or completely worn out, jump starting a car may not solve the problem.
Here are some common signs that indicate your car may need a jump start:
- The engine cranks slowly or doesn’t crank at all when you turn the key or press the start button.
- Dashboard warning lights appear dim or flicker when you try to start the vehicle.
- Headlights and interior lights are noticeably dim or fail to turn on.
- You hear a clicking sound when attempting to start the engine.
- The battery was drained because the headlights, cabin lights, or accessories were left on while the engine was off.
If you notice these symptoms, you can usually jump start a car safely using jumper cables and another vehicle with a healthy battery or a portable jump starter.
Important: If your battery is swollen, cracked, leaking acid, or has a strong rotten egg smell, do not attempt to jump start the car. Replace the battery or seek professional assistance immediately, as a damaged battery can be dangerous.
Tools Required to Jump Start a Car
Before you jump start a car, make sure you have the right equipment. Using good-quality tools and following the correct procedure will help you perform a car jump start safely while reducing the risk of damage to your vehicle’s electrical system.
1. Jumper Cables
A good-quality set of jumper cables is essential. Choose cables with thick copper wiring and insulated clamps to ensure a safe and efficient connection between the two vehicles.
2. A Donor Vehicle or Portable Jump Starter
You’ll need either:
- A donor vehicle with a fully charged 12V battery, or
- A portable jump starter, which is a convenient option if no other vehicle is available.
Before connecting the cables, make sure both vehicles use the same battery voltage. Most passenger cars in India are equipped with a 12V battery.
3. Safety Gloves (Recommended)
Wearing insulated gloves can protect your hands from accidental sparks and help you handle the battery terminals safely.
4. Safety Glasses (Recommended)
Although not mandatory, safety glasses provide extra protection in the unlikely event of sparks or battery acid splashes.
5. Vehicle Owner’s Manual
If you’re unsure about the battery location or the correct jump-start procedure for your vehicle, refer to the owner’s manual. Some modern cars have dedicated jump-start terminals instead of direct battery access.
Ride And Tech Tip: Keep a quality set of jumper cables or a portable jump starter in your car’s emergency kit. It can save valuable time during an unexpected dead car battery situation.
Read More: Monsoon Car Care Tips
How to Jump Start a Car: Step-by-Step Guide
Follow these steps carefully to jump start a car safely. Incorrectly connecting the jumper cables can damage your vehicle’s electrical system or battery, so always follow the sequence below.
Step 1: Park Both Vehicles Safely
Park the donor vehicle close enough for the jumper cables to reach, but make sure the two vehicles do not touch each other. Turn off both engines, engage the parking brake, and switch off all electrical accessories such as headlights, the air conditioner, and the infotainment system.
Step 2: Locate the Battery Terminals
Open the bonnet of both vehicles and locate the battery. Identify the positive (+) and negative (-) terminals. If the battery is covered, remove the protective cover according to the vehicle owner’s manual.
Tip: Some modern vehicles have dedicated jump-start terminals instead of direct battery access. Always refer to the owner’s manual if you’re unsure.
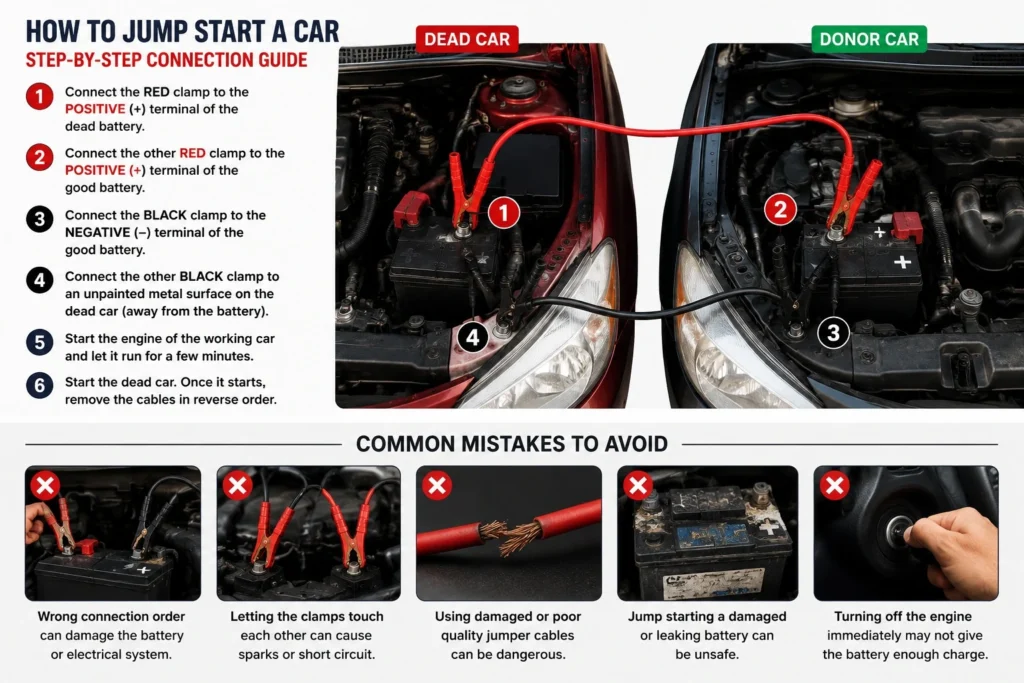
Step 3: Connect the Red Jumper Cable
Connect one end of the red (positive) jumper cable to the positive (+) terminal of the dead battery.
Now connect the other end of the same red cable to the positive (+) terminal of the donor vehicle’s battery.
Step 4: Connect the Black Jumper Cable
Attach one end of the black (negative) jumper cable to the negative (-) terminal of the donor vehicle’s battery.
Connect the other end of the black cable to an unpainted metal surface on the engine block or chassis of the vehicle with the dead battery. This acts as the grounding point.
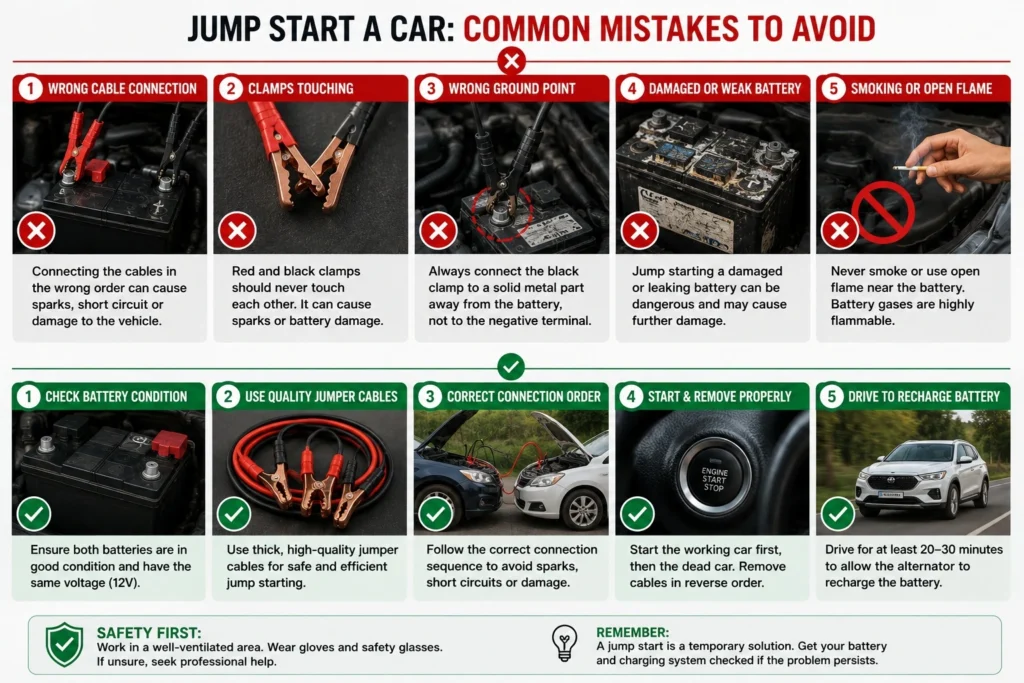
Important: Never connect the black cable directly to the negative terminal of the dead battery, as it may create sparks near the battery.
Step 5: Start the Donor Vehicle
Start the donor vehicle and let it idle for 2–5 minutes. This allows the dead battery to receive enough charge before attempting to start the other vehicle.
Step 6: Start the Vehicle with the Dead Battery
Now try to start the vehicle with the dead battery.
If the engine starts successfully, allow it to idle for a few minutes. If it doesn’t start on the first attempt, wait another couple of minutes before trying again.
Note: If the vehicle still doesn’t start after several attempts, the battery may be completely discharged or another issue, such as a faulty starter motor or alternator, could be causing the problem.
Step 7: Remove the Jumper Cables in Reverse Order
Once the engine is running, disconnect the jumper cables in the reverse order:
- Remove the black cable from the grounded metal surface.
- Remove the black cable from the donor battery.
- Remove the red cable from the donor battery.
- Remove the red cable from your vehicle’s battery.
Avoid allowing the cable clamps to touch each other while disconnecting them.
Step 8: Drive the Vehicle
After a successful car jump start, drive the vehicle for 20–30 minutes or as recommended by the manufacturer. This gives the alternator time to recharge the battery.
If the battery continues to lose charge or the car struggles to start again, have the battery and charging system inspected by a qualified technician.
Ride And Tech DIY Tip
If your car frequently needs a jump start, don’t ignore the problem. A weak battery, faulty alternator, loose battery terminals, or a parasitic electrical drain could be the real cause. Getting the issue diagnosed early can help prevent unexpected breakdowns.
What to Do After Successfully Jump Starting a Car
Successfully jump starting a car gets you back on the road, but it doesn’t always solve the underlying problem. A dead battery may simply need recharging, or it could be a sign of a failing battery, a faulty alternator, or another electrical issue. Follow these steps after a successful car jump start to help prevent the problem from happening again.
1. Let the Engine Run
Keep the engine running for at least 20–30 minutes or take the car for a short drive. This gives the alternator enough time to recharge the battery. Avoid turning the engine off immediately after a jump start, as the battery may not have enough charge to restart the vehicle.
2. Monitor the Battery Warning Light
If the battery warning light remains illuminated on the dashboard after the engine starts, it could indicate a problem with the charging system or alternator. In this case, have your vehicle inspected by a qualified technician as soon as possible.
3. Check the Battery Condition
Inspect the battery terminals for corrosion, loose connections, or dirt buildup. Cleaning the terminals and ensuring they are securely connected can improve battery performance. If the battery is more than 3–5 years old, it may be time to have it tested or replaced.
4. Avoid Repeated Jump Starts
If your vehicle frequently requires a jump start, don’t rely on jumper cables as a permanent solution. Repeated jump starts often indicate an underlying issue such as:
- A weak or ageing battery
- A faulty alternator
- Loose battery connections
- A parasitic battery drain
Identifying the root cause early can help you avoid unexpected breakdowns.
5. Keep an Emergency Kit in Your Car
It’s always a good idea to carry:
- Quality jumper cables
- A portable jump starter
- Flashlight
- Safety gloves
- Basic emergency toolkit
Being prepared can save valuable time if your battery dies when you’re away from home.
Ride And Tech DIY Tip: If your car struggles to start even after a successful jump start, don’t ignore the warning signs. A professional battery and charging system test can identify the exact cause before it leaves you stranded again.
Frequently Asked Questions (FAQs)
1. Can I Jump Start a Car Without Another Car?
Yes. You can jump start a car without another vehicle by using a portable jump starter. These compact battery packs are designed to safely start a vehicle without needing a donor car. Always follow the manufacturer’s instructions when using a portable jump starter.
2. How Long Should I Drive After Jump Starting a Car?
After successfully jump starting a car, drive it for at least 20 to 30 minutes or as recommended by the manufacturer. This allows the alternator to recharge the battery. If the battery repeatedly goes flat, have it tested to check its condition.
3. Is It Safe to Jump Start a Car in the Rain?
Yes, it is generally safe to jump start a car in light rain, provided you follow the correct procedure and keep the jumper cable clamps away from standing water. Avoid performing a car jump start during severe storms or if the battery is damaged.
4. Can Jump Starting Damage My Car?
A car jump start is safe when done correctly. However, connecting the jumper cables in the wrong order or using damaged cables can harm the battery, alternator, or other electrical components. Always follow the recommended connection sequence.
5. How Do I Know If It’s the Battery or the Alternator?
If your car starts normally after a jump start but the battery goes flat again soon afterwards, the alternator or charging system could be faulty. If the vehicle continues to struggle even after charging, the battery may need replacement. A professional battery and charging system test can confirm the exact cause.
6. Can Automatic Cars Be Jump Started?
Yes. Automatic and manual transmission vehicles can both be jump started using the correct procedure, provided they have a compatible 12V battery. Always refer to your vehicle owner’s manual for any manufacturer-specific instructions.
Conclusion
Knowing how to jump start a car is a valuable skill that every driver should have. Whether you’re dealing with a dead car battery at home, in a parking lot, or during an unexpected roadside emergency, following the correct car jump start procedure can help you get back on the road safely while avoiding damage to your vehicle’s electrical system.
Always use good-quality jumper cables or a reliable portable jump starter, follow the recommended connection sequence, and never attempt to jump start a damaged or leaking battery. If your vehicle frequently requires a jump start, have the battery and charging system inspected to identify the root cause instead of relying on temporary fixes.
At Ride And Tech, our DIY Garage series is designed to help car owners handle basic vehicle maintenance with confidence. Stay tuned for more practical step-by-step guides, including how to check engine oil, replace wiper blades, check coolant levels, and other essential DIY car maintenance tips.
Have you ever had to jump start a car? Share your experience or your best battery maintenance tip in the comments below—we’d love to hear from you!
Copyright (c) Ride And Tech. All rights reserved.

1 thought on “How to Jump Start a Car Safely: Step-by-Step DIY Guide”